Practice with a Fondant Cake
Saturday, June 26, 2010
picklewart.blogspot.com
Garrett's 1st birthday is coming soon, and I decided this year that I would make his first cake using fondant... I guess that makes two firsts. I've been told home-made marshmallow fondant tastes sooooo much better than store-bought, and it's much cheaper too... especially if you're making a lot of it! Today was my first go and it went OK. Dyeing fondant seems to be the biggest challenge though (thus the tie dye pink ;-).
I used a home-made marshmallow fondant and here's how it goes:
*Grease counter with oleo (Crisco).
- Pour out 1/2 a bag of powdered sugar onto surface.
- In large greased bowl, pour a full bag of marshmallows (reg or min) and 1/2 Tbsp of water.
- Microwave in 30 sec increments stirring between until marshmallows melt (usually around 2 min).
- Pour melted marshmallow onto powdered sugar surface.
- Grease hands and knead. (This is a very messy process but also a little fun. Who doesn't love pla-dough!?)Work until pliable. If it becomes sticky, add more powdered sugar).
- Roll into ball, grease the ball with oleo, and wrap in saran wrap.
- Refridgerate to firm 4+ hours.
- Buttercream crumb-coat your cake before laying on fondant. Refridgerate an hour or so. When you remove, rub the edges to remove any excessive roughness.
- Roll to 1/4" thickness to lay over cake.
- Lay over cake. Gently rub and pull down to smooth out the sides from overlap. Trim bulk to aid in this process. Set aside bulk for dyeing later.
- To dye, knead the heck out of it with your gel dye (or reg dye). This will seem neverending. Mine never really did become a smooth color!
Below are pictures from our process:
Some handy tools to have around.

Sorry, no pics of MY fondant process... too messy. But here's the finished product ready to go to the fridge. Here's the YouTube How to video link I used though: http://www.youtube.com/watch?v=p9rlJeJsJR0


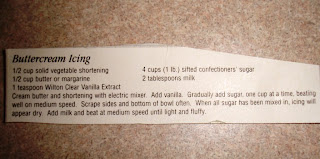
My favorite icing... Wilton's Buttercream below - for my filling and crumb coating above.
My white base layer of fondant layed on and tucked in around the 9" double layer cake.
Grace helped out cutting shapes and rolling balls!
The finished product:
Ready to eat!!


0 comments:
Post a Comment